Friday, July 31, 2009
No More Excuses!
Watch for special online training sessions where I will introduce you to this new method of scrapbooking with Close To My Heart.
I'm off to spend the evening with my sister consultants at Disneyland...thank you Close To My Heart for treating me to a fun evening!
Laurie
Leadership News!
The new Fall/Winter 2009 Idea Book is a huge hit and with tons of new products, you'll be as anxious to have it in your hands as I was. It has been redesigned and you're going to love, love, love it! Several of our products have also been redesigned. My favorite it the new Soft Set Eyelet Tool. Ladies in my workshop groups...we're going to be doing a lot more setting of eyelets!
The most exciting news is that Close To My Heart is introducing an online digital scrapbooking product. If you don't think you have time to scrapbook, you'll think again after the debut of Studio J! More details to come.
Here's my friend, Chris, and I beaming ear to ear because we were all given a beautiful organizational tote! (I love the perks of being a consultant:)
Who knew that 15 years later I'd be celebrating an anniversary with Close To My Heart? I received this beautiful pin as a thank you for my loyalty and service to Close To My Heart. Can't wait to see what the next 15 years bring!
For now, I've got to get back to class so I don't miss a thing. California Adventures awaits us tonight as we have dinner and off to enjoy some rides.
More to come! So long until next time!
Laurie
Wednesday, July 29, 2009
Big Things - Small Packages
Sunday, July 26, 2009
It's A Zoo Around Here!
Recently my sister-in-law had a birthday when I wasn't quite ready for it so you know what that means...yep, she had her birthday without a card from me. When I designed this card originally, it occurred to me that it would make a perfect belated birthday card! What better excuse could I come up with than "It's A Zoo Around Here!" That being the truth, I mailed it off hoping she'd understand my tardiness. She did...and she loved the card!
I should tell you that the red section of the card at the top is secured only by the red brad in the center of the flower on the left. So, the red section flips open (upward and to the left) to reveal the birthday message (with more excuses) that I wrote. Good thing she loves me unconditionally! And, just to get back at me, I'll bet she sends me a handmade card that arrives on-time for my birthday! It's A Zoo (#C1360) is used with Animal Cookies Paper Packet (#item X7112B). Other fluff and fun are ribbons, brads, and paper flowers.
Well, the wedding went very well and I captured the special moments of the day. My favorite photograph is of the ring-bearer handing a bouquet of flowers to one of the darling little flower girls. It's just precious! Maybe I'll have to share that particular image with you soon.
This is a busy week coming up. I'm accompanying my daughter to an out of town wedding the first of the week then a few days after we return, I'll be attending the Close To My Heart Leadership Conference in Long Beach. (I sure hope it's cooler by the sea!) From there, I will meet some of my family in Pismo Beach for a couple of days spent relaxing in the hot tubs, eating Old West Cinnamon Rolls or dining in a tiny shop called Splash eating the best Clam Chowder there ever was! Are you jealous yet? Ah, don't be...let me report to you THEN you can be jealous. In any event, it's all in fun and I look forward to sharing my new adventures with you again soon.
Until next time! Enjoy today- for that's all we have.
Thursday, July 23, 2009
About Me - Tribute Side 2
I have a tendency to design my layouts rather symmetrically (in my safe little box) but a few of my customers never follow my design. They'll tweak and turn photo mats, add a little extra color here or there, and come up with a totally new twist on my original design. One of my gals makes it her mission to be different! And I always look forward to how she'll change my original design.
You may say that this design looks a little crooked - it's meant to! I used Endless Friendship (#D1354) and Bella Paper Pack (#X7114B). It's a simple design so take it and make it your own.
See you again soon!
Monday, July 20, 2009
About Me - Tribute Side 1
This is one page from the Tribute layout. I chose to create a Tribute page so that each of us could remember someone special, either living or not. I left that choice up to each of my ladies. One of my gals completed her layout featuring her 92 year old aunt who is still living. Her journaling included a letter to her Aunt Fern. In the letter (as journaling) she told her Aunt how much she loved to share stories over a cup of coffee. She expressed how much she treasures the values and beliefs her Aunt is passing on to her. I can't think of a more fitting tribute than to write a letter that doubles as journaling and to show appreciation for the legacy her Aunt is leaving.
I've chosen my Tribute page to be about my grandparents. Although they are no longer living, their legacy lives on in my life on a daily basis. This layout will be a celebration of them and their lives! I hope you like it and use it as inspiration for creating your own Tribute layout. I'll have the second page soon.
The Close To My Heart products I've used include Bella Paper Pack (#X7114B ), Endless Friendship (#D1354), Homestead Alphabet (#E1007). The colors in cardstock and ink are Hollyhock, Olive, and Colonial White.
Until next time ~
Friday, July 17, 2009
Captured Memories
One thing I've always done on behalf of my children as they've grown up is occasionally save papers they'd bring home during the school year. In fact, I had an envelope dedicated to each child for each year. I am sooo glad I did this for my kids - and they are glad, too. Heck, to them, homework is for the birds so why not throw it all out once it's been turned in and graded?! Thankfully, I was able to do their thinking for them in this one little area.
Here's a fresh idea for a great project that you can complete in about 15 minutes. It's perfect for a last-minute gift or a treat for you to set on your desk. Any of Close To My Heart's paper packs will work great and the possibilities for this Display Album are endless.
I used our My CreationsTM Display Album (#Z1054), our cool Dimensional Elements Fresh Shapes (#Z1019), and paper from our Tickled Pink special a few months ago. (Just a little reminder...when you see a product special or other promotion, don't let it slip by without checking it out! Usually once it's gone, it's really gone.)
The chipboard Display Album has 12 pages and can stand to display photos, 6x6 layout pages, or it can be used as a brag book. It's perfect for showcasing memories from a vacation or other special event.
Until next time!
Tuesday, July 14, 2009
He Was THIS Big!
We chuckled on our way back to my son's home, saying they'd never believe us. Sure enough, the first thing they asked for when we returned was "evidence". "Ah, it was probably just a really big dog", said my son. "Nu uh...check this out!" And my daugher proudly chimped through her digital images to present the proof.
Now you already know what this has to do with photography...watch your surroundings and for heaven's sake, don't miss a good opportunity! But what's it got to do with scrapbooking? Well, let me return to the subject of photography for a moment. You may have noticed that this is a pretty grainy photograph. Looking closely, you can see that the subject in the middle of the road is a bear but the quality of the photograph is awful. Now, let me say that this is not my daughter's fault...she was simply using one of the many features of her point-and-shoot camera...digital zoom. It's important to note what digital zoom is and what it isn't so rather than take up a lot of space here, jump on over to my Treasures To Memories website and read up on Photo Tips. Back to scrapbooking with your images, you always want the best quality images for your layouts, wouldn't you agree? By taking the time to know your camera's features through reading the manual (yes, I actully suggested THAT!), you will have the power of knoweldge to make quick and wise choices based upon your circumstances. I can't wait to add this little story to my scrapbook, even the "interpolated" bear image! I hope this is as close to a bear in the wild that I ever get.
Sunday, July 12, 2009
A Real Roadie!
My husband Joe, myself, and our unemployed, still-to-young-to-leave-behind daughter all took off from California to drive to Washington State to see our son. We made it up there in not 1 single day, like my son makes the trip home (crazy, I say!), but we took a little over a day and a half. It was well worth it because we took some routes that were off the beaten path and saw some beautiful country. The highlights for me had to do with photography...which will eventually make it centerstage in my scrapbooks! Or better yet, in a big print on my wall. Because I wasn't driving, I could be a lookey-lou and scout out barns, fences, fields of wildflowers, and the like then jot down the location so I could sweet-talk my husband/driver into stopping at those locales on the way home. I'd say I got about 50% of the bargain, probably less. That's better than being disappointed altogether! But guess what? I'm going again! BY MYSELF! (Someday:-)
I'd be remiss in not mentioning that the best part of the trip was spending time with our son and his girlfriend. His home sits in a clearing in the middle of a forest...I call it the Enchanted Forest...that way I don't get too spooked.
My daughter and I weren't too far away from his home and I was photographing wildflowers and tree stumps when my daughter yelled from the car, "Mom, a bear!" That was the last thing I expected to find but then again, I'm from California and well, a tanned bum toting a surfboard might have been a more familiar - and less threatening - image. The big guy stood about 100 feet in front of us just staring us down. I made sure I had time to finish making my photographs before jumping in the car for a feeling of safety. Does a heavy tripod make a good self-defense weapon?? Soon after, he wandered over to the side of the road before disappearing in the brush. I learned one good lesson on this roadie...when visiting the great Northwest, keep one eye out for BEARS!
Thinking what we had really seen was just an overgrown dog, when we returned to our son's home, he quickly requested the "evidence", doubting two girls could tell the difference between a bear and a dog. You just watch us!
Our roadie took us to my friend, Chris Green's house for a delicious pizza lunch with her family. The only other time I've been with Chris has been during Close To My Heart events (we're both consultants) so this was really special. We could have reminisced about the Mediterranean Cruise for hours but I'll bet that both our husbands would have fallen asleep. So, we made our visit short and sweet and we'll continue sharing the fun memories the next time we are together.
Lastly, I am so blessed that we were able to take the time to create warm, wonderful, and special memories with those we love and miss dearly. (Brandon, move back closer soon, eh? I'll even come and get you!)
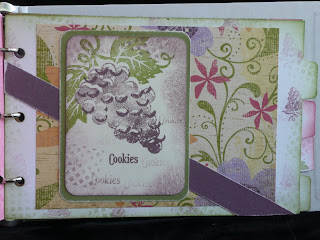
To close, I'm including one more darling divider from my Recipe Book Album that I promised a while back. As you'll begin to see, they are all similar but each with their own character. Hope you enjoy!
Monday, July 6, 2009
CTMH TV
No matter where you live in this big ol' world, we can all use computer technology to tune in at least once a month and view the latest and greatest in the stamping and scrapbooking world via CTMH TV. Presented by Jeanette Lynton, the founder and CEO of Close To My Heart, each 6-9 minute presentation focuses on a main project, including in-depth instruction and full visuals. In the latest episode, you'll learn how to add a splash of ink, a dash of glitter, and add a touch of creativity as you learn how to create inspiring projects that will make your summer sparkle! Also in this episode of Art & Soul you’ll learn a faux tearing technique, tips for adding white details that pop, and glitter ideas that will make your pages gleam. Take a walk down memory lane with Jeanette as she compares her scrapbooking pages from “then” and “now.”
Click here and you'll go right to the current episode of Art and Soul. While you're there, be sure to check out past episodes. Well, okay...before you go, I guess you'd better grab a tall class of icy cold lemonade, get comfy, and prepare to be wowed!
I'll be away from my computer for a few days but who knows, I may surprise you and post anyway.
See you again soon!
Sunday, July 5, 2009
Recipe Book Add On
As a reminder, I used the following Close To My Heart products:
~Z1141 My Creations 3-Ring Binder
~X7114B Bella Paper Pack
~D1367 Bon Appetit Stamp Set
~ D1364 Recipe Box Stamp Set
Stamp pads used include Close To My Heart's Exclusive Inks™ in the following colors: Z2147 Smokey Plum, Z2128 Hollyhock, Z2137 Olive. Don't you just love the grapes and leaves stamp set? It's an all-time classic and one of my favorites.
Everyone should have friends like our dear friends, Guy and Melissa. (This is me with Melissa, not Guy!) We spent a few days with them over the 4th of July. Melissa makes an outrageous Oreo Cookie Cheesecake. I'll share that recipe with you here, especially since today's post features a page from the recipe book.
Melissa's Oreo Cookie Cheesecake
Process in food processor (or smash by hand in a ziploc bag):
2 cups Oreo Cookies, including whites
4 tablespoons butter
Pat with spoon in 9" springform pan.
Beat:
4 - 8oz. pkgs. cream cheese
1 1/4 cups sugar
2 tablespoons flour
Add: 4 whole eggs and 3 egg yolks. Beat until mixed. Stir in additional crushed Oreo Cookies. Pour in pan. Top with whole Oreo Cookies. Bake at 425 degrees for 15 minutes then reduce oven to 225 degrees and bake additional 50 minutes. When knife inserted in cheesecake comes out clean, turn off oven and let cheesecake sit in over for 15 minutes. Take out after 15 minutes, let cool, then refrigerate. Top with 2 cups sour cream and 1/4 cup sugar.
Notes: Get yourself plenty of Oreos! Two bags should suffice. We ran short of Oreos but I had some Reese's Peanut Butter Cups on hand so I chopped those up and threw them in with the Oreos. Yummy!
Friday, July 3, 2009
Projects celebrating America's July 4th holiday should include Close To My Heart's traditional patriotic colors such as those shown in the swatches on the left. Additionally, several of our scrapbook kits are perfect for your 4th of July photographs. I might suggest the following themes:
Animal Cookies
Back Country
Blue Ribbon
Route 66
All of these themes are available in Level 1 Scrapbook Kits (4 pre-printed pages with 2 sheets of My Stickease), Level 2 Paper Packs (cardstock and patterned paper), and My Stickease. You can see each of the themes in the current Idea Book or view them at my http://www.laurie.myctmh.com/ website. (Pssst...you can place your order there, too!)
Are you prepared to take photographs at your 4th of July celebrations? I hope so! Here are some tips to help you achieve great fireworks photos.
Tip 1: If shooting with a point-and-shoot camera, check to see if there is a 'fireworks' setting. If so, use it!
Tip 2: Watch your backgrounds. Shoot low and into the sky if possible. Watch for errant objects in the background that might distract from the fireworks.
Tip 3: You'll be using a slow shutter speed so if possible, use a tripod.
Tip 4: Shoot verticals and horizontals. Watch to see that your horizons are horizontal!
Tip 5: If your camera has a shutter lag (that annoying time between pressing the shutter button and when the exposure is actually taken), anticipating the action may result in more successful images. Press the shutter just before the fireworks explode.
Tip 6: Switch your flash to OFF.
Now go out and have fun!
Thursday, July 2, 2009
The following Close To My Heart items were used to create this lovely recipe book:
~Z1141 My Creations 3-Ring Binder
~X7114B Bella Paper Pack
~D1367 Bon Appetit Stamp Set
~ D1364 Recipe Box Stamp Set
Directions:
1. Cut a piece of Bella B&T paper to fit front of binder.
2. Cut a 2nd piece long enough that will cover the back and side of the album and wrap around to the front.
3. On the end that wraps to the front (the pink shown on the left), fold and crease back to the left as shown. Glue in place.
4. Stamp as desired.
The 3-Ring binder has 5 tabbed inserts than can be used as recipe category separators. Cover each insert with any coordinating Bella B&T paper and stamp as desired.
Gift-giving suggestion: Make several recipe books and give as gifts for the holidays.
Wednesday, July 1, 2009
CLOSE TO MY HEART CONSULTANT
1. Earning $$ doing something I love!
2. Raising a family while contributing financially.
3. Friends have become customers and customers have become friends.
4. The cruises!
5. Supporting my second love, photography.
Along with a new month comes a new Stamp of the Month. It's a great one, too. But then again, is there ever a month where we don't have a great Stamp of the Month? Remember that each Idea Book includes 4 months of Stamp of the Month specials. You'll always find them on the inside back cover.